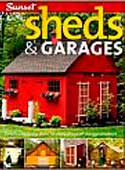
A Colonial-style storage shed that anyone can build.
By Joseph Truini
Homeowners complain about having too much storage space about as often as they do about having an overabundance of cash. It just doesn’t happen.
Nearly every home, regardless of its size, has a shortage of accessible storage space. Need proof? Take a peek into the average garage and you’ll likely find it crammed full of bicycles, lumber, garden tools, trash cans, outdoor power equipment, sports gear and car-care supplies.
An occasional spring-cleaning can help you reorganize and reclaim some space, but it’s only a matter of time before the clutter returns. What you really need is more space, and one of the best ways to find it is to create it by building a backyard storage shed.
We built the Colonial-style garden shed shown here from a set of mail-order building plans. The 10 x 16-ft. outbuilding has easy-to-install plywood siding, three large windows and two pairs of doors. The entire building could be used for storage, but we decided to divide the interior space into two separate areas: a 4 x 10-ft. tool-storage area and a 10 x 12-ft. children’s playroom.
It’s hard to say exactly how much it will cost you to build this shed. Lumber prices fluctuate almost daily and vary widely from one region of the country to another, but figure on spending between $1600 and $2000. Before starting construction, take your plans to your local building department and apply for a building permit.
Starting At The Bottom The shed we built rests on a foundation made up of 12 solid-concrete blocks. The 4 x 8 x 16-in. blocks are arranged in three rows spaced 59 in. apart. These blocks are typically set directly on the ground, but we put down a 4-in. bed of gravel first because our site occasionally receives groundwater. The gravel will keep the soil beneath the shed from eroding or becoming soggy.
After laying out the 12 blocks, use a straight 2 x 4 and a 4-ft. level to ensure that all the blocks are level (Photo 1). Shim up any low blocks with strips of asphalt roofing, cedar shingles or 2-in.-thick concrete patio block. Next, form each front and rear band joist by nailing a 2 x 6 to a 2 x 8 mudsill. Set the mudsills on top of the blocks running across the front and rear of the shed. Cut a third 2 x 8 mudsill to fit along the tops of the center row of foundation blocks.
Cut all the 2 x 6 floor joists to length and set them between the two band joists and on top of the mudsills (Photo 2). Space the joists 16 in. on center and secure them with 16d galvanized nails (Photo 3). Before nailing down the plywood floor, secure the floor frame with four steel-cabled ground anchors, which are code-required in some areas. Bolt one anchor to each corner of the frame and drive the holddown spikes deep into the ground.
For the shed floor, we used 3/4-in. tongue-and-groove ACX plywood. Tongue-and-groove joints create a rigid floor that doesn’t bounce or sag. Secure the plywood with 8d galvanized nails (Photo 4).
Framing The Roof Trusses Each truss is made up of two 2 x 4 rafters and one 2 x 4 ceiling joist. The three boards are joined together with 1/2-in. plywood gussets. To speed up the assembly process, build all the trusses on the shed floor before erecting the walls. Start by cutting all the rafters to length with a 40° angle at one end of each. Cut 2 x 4s to 10 ft. long for the bottom chords of the trusses. Also, cut all of the plywood gussets.
Make a template on the shed floor for assembling the trusses. Begin by laying out the parts for one truss. Align the bottom chord with the edge of the plywood floor. Then cut four 24-in.-long 2 x 4s. Lay two alongside each rafter and screw them to the plywood floor. Now use these short boards as stopblocks for laying out and assembling each truss. Fasten plywood gussets to each side of every truss with carpenter’s glue and 1-in. roofing nails (Photo 5) and set the trusses aside.
Building The Walls Cut all the 2 x 4 parts for the end wall and lay them out on the shed floor. Space the studs 24 in. on center and secure them with 16d nails (Photo 6). Then cut the plywood siding to size and nail it to the wall framing with 6d galvanized nails.
Tilt the wall up into place (Photo 7) and secure it with 3-in. deck screws (Photo 8). Frame and erect the rear wall, followed by the front wall. Then, install the interior partition. If you’re including a playroom, as we did, cover the partition side that faces that room with plywood, and screw it in place. Then install the final wall.
Setting The Roof Trusses Start framing the roof by installing a sheathed truss at each end of the shed (Photo 9). Secure these with 3-in. deck screws driven into the top wall plate. Then, install the remaining roof trusses (Photo 10). Set one truss over every wall stud and fasten it by driving 3-in. deck screws up through the top wall plate.
Cover the trusses with 1/2-in. CDX plywood, then nail on the asphalt roof shingles (Photo 11).
Finishing Touches Secure perforated hardboard to the partition wall in the tool-storage area (Photo 12), and install a transom window over the gable-end doors (Photo 13). Make the window by assembling a simple wood frame to hold a piece of double-strength glass.
Next, build the doors from 1 x 6 tongue-and-groove cedar boards and battens cut from 1x stock. Attach the battens with 1-1/2-in. screws, and hang the doors with heavy-duty strap hinges (Photo 14).
For the windows, we used wooden barn sash, which tilt in for ventilation (Photo 15). The 2 x 3-ft. windows are available at most lumberyards for about $60 apiece. Install a barrel bolt at the top of each sash so they can be locked shut.
The textured plywood siding we installed came with a factory-applied coat of primer. We finished it with two coats of barn-red acrylic latex paint. If you would prefer to stain your shed, be sure to buy unprimed plywood siding.
Shed Plans By Mail Want more information on building this versatile storage shed? A set of detailed building plans is available from Better Barns, 126 Main St. S., Bethlehem, CT 06751; www.betterbarns.com.
The 2 x 3-ft. plans sheet (Plan No. 2009, $29.95) is printed on both sides and includes 24 detailed illustrations and a materials list. In addition, Better Barns can supply hardware, such as the hinges and latch we used, and other shed options.