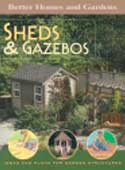
These practical yet stylish backyard structures offer more than a place to store the mower.
by Joseph Truini for Today’s Homes Owner Magazine
Homeowners have always had a love/hate relationship with backyard sheds. We love the extra storage space, but hate the way they look. That’s because the average prefabricated storage building is an unattractive, cheaply made sheet-metal or plywood box with all the durability of a rice-paper umbrella. This explains why many sheds are relegated to the deepest, darkest corner of the backyard. Some neighborhood associations have even banned outbuildings altogether because they consider them eyesores.
However, there’s no reason that a shed can’t be well-designed and solidly constructed–a building that actually enhances the beauty of your yard, home and neighborhood. If this is the type of backyard building you’ve been looking for, your search is over. Presented here are three attractive structures that offer much more than just storage space. Each building can easily be adapted for use as a potting shed, workshop, children’s playhouse, home office or retreat to write the great American novel.
If you are inspired to add one of these structures to your yard, mail-order building plans are available for the Adirondack Cabin and Timber Garden Shed. The Solar Shed is sold as an easy-to-assemble kit. However, before getting started, be sure to submit the plans to the local building department and get a building permit.
The design of this cabin was inspired by the 100-year-old log buildings at the Adirondack Museum in Blue Lake Mountain, New York. It features a massive log frame and Japanese-influenced details to create a structure that’s both rustic and refined.
A set of detailed building plans ($49.95) is available from Better Barns, a Connecticut-based shed-building company. The Adirondack Cabin shown here was built and installed by Better Barns for about $18,000.
Construction details. The 12×12-ft. cabin is framed with 10-in.-dia. red-pine logs. However, unlike most log- or timber-framed buildings, the exterior walls of this cabin are set inside of the log frame. As a result, the peeled pine logs are visible from both inside and outside the building.
To complement the rustic look of the large logs, the cabin’s wall studs are chunky 4×4 studs (not skinny 2x4s), and the roof rafters are cut from rough-sawn, full-dimension 2x6s.
The walls are sided with rough-sawn, tongue-and-groove 1×6 cedar, which is nailed vertically to the 4×4 framing. Traditional barn-door hardware was used to create the sliding door, which glides open to reveal a 48-in.-dia. round window on the back wall. In keeping with the cabin’s simple, clean lines, a pair of modest-sized decks was built leading up to the entrance. Decks are more attractive and functional than a set of stairs and they create a small seating area.
The gable roof is topped with architectural-style asphalt shingles. But on the inside it’s framed to resemble a wood-shingled roof: Spaced sheathing was nailed to the rafters and then topped with lauan plywood. After a layer of felt underlayment was stapled in place, the shingles were nailed down. It costs a bit more to construct a roof in this manner, but the results are well worth it–and totally appropriate for this unique cabin.
Talk about versatile. The Phoenix Solar Shed is part greenhouse/part storage building, and it’s designed with enough flexibility to fit comfortably into any yard. The saltbox-style shed is available from Handy Home Products as an easy-to-assemble kit. All wood parts are precut, and even the nails and screws are included; you supply the paint and roof shingles. A floor-frame kit ($215), which contains precut joists and plywood subfloor, is sold separately.
The basic Phoenix Solar Shed ($1,100 to $1,200) is an 8×10-ft. building with an all-glass roof on one slope. But, you can easily enlarge the building?in 4-ft. sections?with a shed-extender kit. For example, to increase the glass area, order the glass-roof extender ($425); for more storage space, add a solid-roof extender ($225). We added one solid-roof extender to create a 10×12-ft. shed.
This flexibility lets you create just the right amount of interior sunlight and shade, while keeping the shed within your budget and space requirements.
Construction details. The numbered parts go together like a giant puzzle. The assembly will also go quicker if you erect the shed on a level spot. Our shed was built on top of a pair of pressure-treated 4x4s laid on a level bed of compacted gravel. If you live in a cold-weather region, you might be required to dig down to the frost line and pour concrete footings or piers.
The floor frame was assembled first and fastened to the 4x4s; then the plywood subfloor was nailed down. Next, the exterior walls were nailed together on the ground and raised up on the floor. The roof trusses were also assembled on the ground, then lifted into place on top of the walls.
The oriented-strand-board (OSB) roof sheathing went down next, followed by four 20×70-in. roof windows. The aluminum-frame windows fit neatly between rafters for a no-fuss installation.
This 10×14-ft. Timber-Frame Garden Shed has a rugged, yet charming style that will complement any yard or garden. Designed by New York-based architect Ira Grandberg, it features a post-and-beam frame, pine siding, dual sliding doors and a brick-in-sand floor. However, the most interesting characteristic is that you can fill any of the bays within the timber frame with a choice of materials. We enclosed the frame with tongue-and-groove pine boards and barn-sash windows. Other options include: a recessed box for firewood storage; tilt-out bins for bags of seed or fertilizer; and a hutch for trash cans.
The materials to build this shed cost $2,500, including the shingles and brick pavers. Plans are available for $50.
Construction details. The framework is built of pressure-treated pine timbers: 6x6s for the walls, and 4x4s for the roof rafters. The 6×6 posts and beams were joined with mortise-and-tenon joints, but you can save time by joining the 6x6s with metal timber-framing hardware.
Our shed was built on a sloping lot, so the foundation was made by stacking three 6x6s on top of a bed of gravel. The top course of timbers served as the mudsill. Mortises were cut into the sill to accept tenons that were milled into the bottom ends of the posts.
The only angle cuts in the entire frame were made on the roof. The 4×4 rafters are mitered to 40 degrees where they meet the 2×6 ridge board, and the collar ties, which are screwed across the rafters, are cut at 50 degrees.